Open Live Writer is free offline blog editing software. Using Open Live Writer you may edit your blog posts in WYSIWYG mode. It is intended for many platforms, prominent of them are WordPress and Blogger. It is an open source product. Copyright of Product belongs to .NET Foundation. You can download Open Live Writer free of cost. After reading the post, you would be able to compose your Blog Post for WordPress platform and Blogger platform like a professional blogger (Blog Writer).
Table of Contents
History – what was Windows Live Writer?
Windows Live writer was a free offline Blog Editing software from Microsoft. Windows Live Writer was based on “Onfolio Writer” which Micorosoft acquired in 2006. C++ and C# programming languages were used for programming of Windows Live Writer.Last major release of Windows Live Writer happened in 2012. Product was completely discontinued in 2017. In 2015, Microsoft announced the Open Source version of Windows Live Writer. Microsoft donated the code to .NET Foundation and hence product “Open Live Writer” came into existence.
History of Open Live Writer.
Open Live Writer is an open source fork of the original Windows Live Writer; an application for authoring, editing, and publishing weblog posts. Hence, most of the articles written for Windows Live Writer would work with Open Live Writer as well.First version of “Open Live Writer” was released on December 9, 2015. Product version was 0.5.0.0. Product uses GitHub repository for product development.Last version of product was released on May 23, 2017 and version was 0.6.2.0. Last change on source code was in 2019. After that, the product was abandoned. Unfortunately, You won’t find support for the product, if something breaks. Still, it is a great tool to compose your WordPress blog in a WYSIWYG offline editor.There is some issue with support of Open Live Writer, with Google’s blogger platform, which I will discuss later and will suggest you work around for the issue. Both Open Live Writer and Windows Live Writer use XMLRPC protocol to publish the post on blog.
Open Live Writer – Free Download and Install
* Requirements
– Operating System – Windows 7 or above
– Platform – x86 (32 bit) or x64 (64 bit)
* Download Open Live Writer by clicking the link.
– Save the installer in a folder.
Installation and Configuration
* Using File explorer, open the containing folder where the installer is downloaded.
* Double Click the executable installer and follow the instructions.
* If you are not a Windows Administrator, installation will ask you for Administrator credentials
* In the last stage of installation, configuration starts and you need to provide WordPress blog credentials.
* Even if you are planning to use Open Live Writer for Google’s Blogger platform, you need to use a WordPress blog account. As, support of Google Blogger platform is broken (I will discuss it later). In case you don’t have a WordPress blog, create a free blog (and blog account) at wordpress.com.
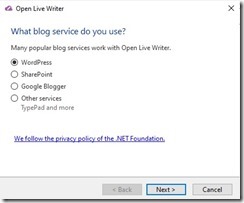
* Blog configuration – choose the blog service you use. Choose “WordPress” and click Next.
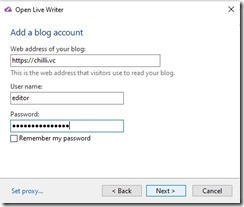
* provide details of WordPress blog with user id and password
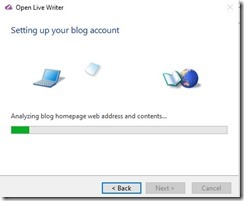
* It starts setting up a blog account. Verifies settings and configurations of blog and downloads it.It analyse blog contents as well.
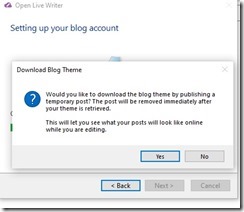
* Subsequently it gives the message “Would you like to download the theme by publishing a temporary post, This post will be removed immediately after your theme is retrieved” . Click “Yes”, it will take some time while Open Live Writer downloads theme files to your computer.It also downloads supporting files to your computer as well.
* Once the blog account settings is complete, it will ask for a nickname of the blog account. Put any descriptive name you want the blog account to be known as.
* After Installation and setting up for the first blog succeeds, you may add additional blog accounts as well.
* To add an additional blog account, start “Open Live Writer”, Go to “Home” menu at the top of the Open Live Writer interface. At the right hand side of “Publish” Button, There is the name of your active blog, Click it. In my case there are two blog accounts.
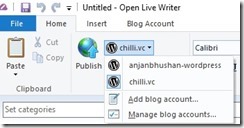
* You may be able to add a new blog account or update an existing blog account.
When Theme Download fails for a Blog Account
* Sometimes, the download of a theme file fails for certain themes. There is work around for that.There is a small tool which may help you fix this issue. Theme Fixer Tool for WordPress Blog theme, download the tools and read instruction..
* It’s possible that theme files still couldn’t be downloaded. No worries, You may still write a post and Publish it to the blog. I will deal with this topic in detail in the section “Composing a Blog Post for WordPress Blog”.
Code Syntax Highlighter Plugin
* You may write a post, in which you need to include code.There are not many plugins for Open Live Writer, but there is a plug-in for “Syntax Highlighting”.
Please visit the developer site to download and configure “Syntax Highlighter” aka “source code” plugin. For “Open Live Writer”, please use version 2 of the plugin. More Infor about Syntax Highlighter Plugin.
* After the plugin is configured correctly, Restart Open Live Writer, if already opened. Click on the “insert” menu item in the user interface. You would see an icon for “Source Code”.
Composing a Blog Post for WordPress blog
* “Open Live Writer” has a tabbed interface for edit, preview and source. You may toggle between them.You can find a link of the three tabs at the bottom of GUI.
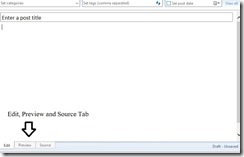
* Edit Tab – Enter a post title and start composing your blog post. By Default, Edit tab provides edit mode based on downloaded theme. In case your theme was not downloaded, it will give you workspace using the default of Open Live Writer.Personally, I don’t like the theme interface for composing my post. You may disable the theme while editing by “Blog Account” Menu and Clicking on “Blog Theme”.You may toggle between enabling and disabling theme based editor by clicking “Blog Theme”.
* Preview Tab – It will show you, how a blog post will look like on your website. If for some reason, WordPress theme couldn’t be downloaded while adding the account, “Preview” will show the default view of Open Live Writer. This is a non issue,Why? Will let you know in the later part of the post.
* Source Tab – You can view Html source code for your post. Sometimes, automatic formatting by Open Live Writer breaks the post,you may fix it directly in source,and a modified version of the blog post will show in the Edit tab as well.
* Use different HTML tags to your post,Open Live Writer is a WYSIWYG editor, you may click various page elements, available under the “home” menu while using the “Edit” tab.
* To add a table, go to the “insert” menu and add the table.
* You may change default dictionary by visiting “insert” menu –> “Plug-in Options” –> “Spelling”
* While editing you may save a local draft of the blog post by visiting the “File” menu –> “Save”–> “save”. Alternatively, use CTRL+S to save the local draft of the blog post.
* Inserting an Image in a blog post – You may insert an image from the web or your computer. When you insert a local image at the time of post, the image will get uploaded to your WordPress site and links will be modified to reflect the link on the website, after you “Post draft to blog” or “Publish” the blog.
Best Practices to Compose and Publish a post for WordPress blog.
Following are steps I use for publishing a post for this blog Chilli.vc
* Write a Post in Notepad++ with English dictionary enabled. You may read about it, in one of my previous posts. Save the post as a text file on your computer. Link of Notepad++ Tutorial
* Create a new document using Google Doc by visiting https://docs.google.com/ and copy, paste the notepad++ content in Google docs. Google docs provide you grammar checks. Fix all grammar suggestions offered by Google Docs.
* Copy paste the modified content Suggested Google docs document, to a new Notepad-document. Save this file as well. Say name of saved file is “Modified-by-google-docs.txt”
* Open “Open Live Writer”, Use “Edit” Panel.Enter a “Post Title”, then copy paste contents from “Modified-by-google.txt” to Open Live Writer, one paragraph at a time. Do formatting using WYSIWYG options available in “Open Live Writer”. Use H1 to H6 tags as needed. Insert Images from your computer or web.
* After your post is ready, Choose category for the post and enter tags separated by comma. Then use the “Post Draft To Blog” option. You may find the link under Home Menu for “Post Draft to Blog”.
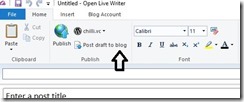
* Now go to the WordPress Admin interface of your blog and choose the “Edit” option against the saved draft. Fine tune the contents, like if you are using a SEO plug-in, you may modify the content as suggested by SEO plug-in. If there are any more settings of any other plug-in,configure it as well. When you have finalised the content, use the “view” option to see how your post would look after publishing. After everything is done, “Publish” the post. Eureka! You are done!
Blogger Support of “Open Live Writer”
* Blogger.com is a free blogging platform provided by Google.When you try to add a Google Blogger account, it fails. Google gives an error “This App is Blocked” and provides explanation “This app tried to access sensitive info in your Google Account. To keep your account safe, Google blocked this access”.
* Unfortunately, Google has blocked the “open live writer” app to share the data and the Open Live Writer project is abandoned. But, there is a work around, which I will deal in next section.
How to use “Open Live Writer” for Blogger
* Following are steps I take to compose post for one of my Blogger blog, hi.fi.vc, using “Open Live Writer”
* Since, You can’t link your Blogger blog to “Open Live Writer”, you need at least one WordPress blog. If you have a self hosted WordPress blog, add that to “Open Live Writer”. If you don’t have a self hosted WordPress blog, create a free blog at WordPress.com. Use the credentials to add a blog account for “Open Live Writer”
* To compose a Blogger blog post,Go to the Edit tab of “Open Live Writer” Enter a post title and use the same process as suggested above, means create a post in Notepad++, Run a grammar check using docs.google.com. Copy-paste modified text to “Open Live Writer”, one paragraph at a time.
* If you need to upload an image or video from a file, please do not do so. Just put the name of the file you would like to upload in post. If you need to include an image or video from the Web, you should do so.
* Save the local draft to the computer.
* Now visit the “Source” tab in “Open Live Writer”, use “CTRL+A” to select all content of the post.Then use “CTRL+C” to copy all content in clipboard.
* Login to Blogger using credentials, applicable for your Blogger blog. If you have more than one Blog in your Blogger account, choose the blog you want to use.
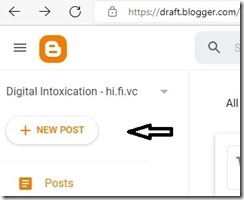
* Click on New Post
*Provide Title of your post.
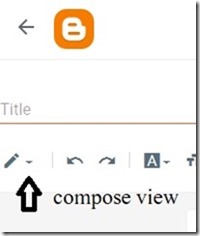
* There are two modes of editing in Blogger. First, “HTML view” and second is “Compose View”. If, by default, the view is not “HTML view”, please choose “HTML view” by clicking the “pencil” icon just below the Title, at left hand side.
* When you click “compose view”, it will give you the option to toggle between “HTML view” and “Compose view”.
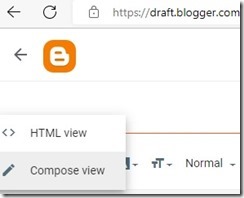
* In the “HTML view” paste the content you have copied from “open live writer” by pressing “CTRL+P”.
* Now You need to insert images and video from your computer, go to the content and look for file names you need to upload to the blog. Using the insert image link in “HTML view”, choose the image from your computer. Same, is true for Video from your computer.After you insert image and video from your computer, remove the file names, you added while composing the content in “Open Live Writer”. Once everything is done, Use “Preview” button and once you are satisfied, “Publish” the post. Eureka! You have made a post at Blogger Platform!
Summary : Open Live Writer is still a great tool to compose your blog on your computer.If you like the post, please share it to social media by links below the article. Also, please visit the “Homepage” of the blog and look for the section “Our Social Media Presence”, follow our page at Facebook and Linkedin. Also to keep you updated with the blog please subscribe to the Newsletter.

